Õpitoa kuupäev: 21.11.2019
Kellaaeg: 18.00-21.00
Kellaaeg: 18.00-21.00
Koht: Teeme Teistmoodi käsitöösalong (Tondi 50, Tallinn)
Õpitoa hind: 35.-
Juhendaja: Maria Lillepruun
Õpitoa hind: 35.-
Juhendaja: Maria Lillepruun
(на русском читай ниже)
Selles mixed media õpitoas valmistame Teiega uhket ažuurset pildiraami. Pildiraam tuleb talvine, lumine, sinakasvalgetes toonides.
Soovitame tuua koolitusele vertikaalne foto, mida sooviksite oma tehtud raamis näha. Pildi valimisel arvestage palun pildiraami talvise temaatikaga. Pildiraami ava suurus on 14x20 cm, seega Teie pildi suuruseks sobib eelkõige 15x21 cm. Aga vajadusel saame ka veidi väiksemat vertikaalset pilti või suuremat sorti horisontaalset pildi antud raami sisse kenasti paigutada. Kui Teil pole võimalik koolitusele pilti kaasa tuua, saate selle ikkagi hiljem kodus valmis raami sisse panna :)
Töötoas töötame akrüülvärvide, kahte sorti tekstuurpasta, kunstlume ja särapalbritega. Kaunistuseks kasutame käsitöölilli, pitsi, pärle, marju jne.
NB! Koolitusele palume kaasa tuua:
-pilt (või mitu, et saaks kohapeal valida)
-olemasolu korral väike liimipüstol liimipulkadega
-kuuma embossingu föön (selle puudumisel juukseföön)
-pilt (või mitu, et saaks kohapeal valida)
-olemasolu korral väike liimipüstol liimipulkadega
-kuuma embossingu föön (selle puudumisel juukseföön)
Koolituse kestvus: 3 tundi
Õpituba sobib ka algajatele. Alates vanusest 14. a.
Hind: 35 EUR
Hind: 35 EUR
Osalejate arv on piiratud.
Vajalik eelregistreerimine ja ettemaks 15 EUR.
Vajalik eelregistreerimine ja ettemaks 15 EUR.
Osalemissoovist kirjutage meilie MagicAtticDesign@gmail.com
Lisainfo: 55664252, MagicAtticDesign@gmail.com
МК проходит на эстонском языке, но при надобности руководитель сможет осуществить для Вас и перевод на русский.
На этом миксмедийном МК мы с Вами изготовим красивую ажурную фоторамку на основе заготовки. Руководетель предложит Вам заготовку с окошком для фотографии размером 20 на 14 см, так что в идеале для рамки подойдет вертикальная фотография стандартного размера 21 на 15 см. Советуем захватить подобную фотографию с собой. Это, конечно, не обязательно. Добавить еe в рамку Вы сможете и позднее дома. Но интересенее делать рамку сразу под конкретное фото. При надобности, сможем красиво уместить в рамке и горизонтальную фотографию, но не слишком маленькую.
При выборе фото учитывайте специфику МК. Мы будем делать зимнюю, снежную фоторамку в синевато-белой расцветке. Поработаем с акриловыми красками, с двумя текстурными пастами, искусственным снегом, глиттером. Для украшения используем цветы ручной работы, бисер, бусины, стразы, ягоды, кружево и т. д.
NB! На МК принести с собой:
-фотографию (или несколько)
-если дома есть, клеевой пистолет с палочками клея
-обычный фен или фен для эмбоссинга
-фотографию (или несколько)
-если дома есть, клеевой пистолет с палочками клея
-обычный фен или фен для эмбоссинга
Продолжительность МК: 3 часа
Подходит для новичков. Ограничение по возрасту: с 14 лет.
Стоимость: 35 евро
Стоимость: 35 евро
Количество участников МК ограничено.
Необходима регистрация и предоплата 15 EUR .
Необходима регистрация и предоплата 15 EUR .
О желании участвовать пишите на MagicAtticDesign@gmail.com
Дополнительная информация: 55664252, MagicAtticDesign@gmail.com
|
|
Hello, dear friends!
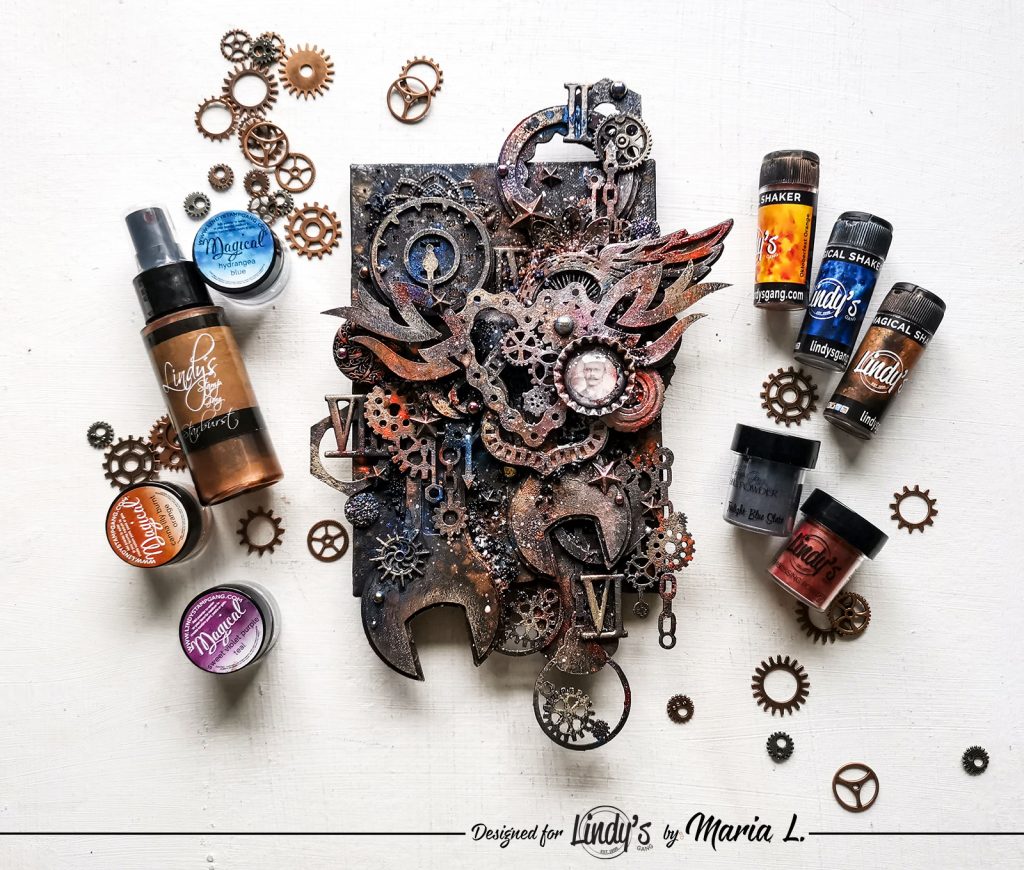
I guess this is my first steampunk project for Lindy´s Gang, although I am a huge fan of the style! I made a relatively small canvas, a new wall decoration for my studio. Luckily, I still have not run out of free space on my walls, but this moment is getting terribly close hahaha...
So here is what I made for your inspiration.
I am in love with Lindy´s Gang sprays and Magicals, but I was not too fond of shakers, because I seemed to have too little control of them while using. But it has all changed now! I have tried them on this project, on black background, and the colorful stains they left were pure magic! So I will definitely let myself free now and will play with my shakers more often!
Basic Process
- First of all, I primed the canvas with black gesso, so it created a perfect background for my project. I also covered the biggest chipboards with the same gesso, doing so on both sides, especially for the chipboards sticking out of the edges of the canvas.
- Then, I arranged my composition on the canvas, combining a lot of chipboard and metallic embellishments in layers. After I was happy with the composition, I glued all to the surface using contact glue and hot melt glue and painted all black with the same gesso.
- When the surface was dry, I prepared three shades of metallic acrylic paint. This is super easy to do by mixing any white metallic paint with Lindy´s Gang Magicals. I used beautiful shades Sweet Violet Purple Teal, Hydrangea Blue, Canna Lily Burnt Orange from the Victorian Bouquet Shimmer Set. When my paint was ready, I painted all the decorations with a semi-dry brush.
- After that, I sprinkled three shades of Shakers chaotically on the surface. My preferred masculine combination was Bratwurst Brown, Oktoberfest Orange, and Bavarian Blue. When I sprayed some water over the powder, the color effect was truly impressive.
- Two different embossing powders (Terra Cotta Rust, Twilight Blue Slate) made the project look more complex. It is good to mix the colors and textures altogether, and EPs give us a great opportunity to add both of them to our creations.
- I added some quartz toppings and microbeads for extra texture, as well as some shiny rhinestones.
- I also used Mission Bells Brown spray to add some depth to the project and sprinkled some white paint over the whole surface as a final touch.
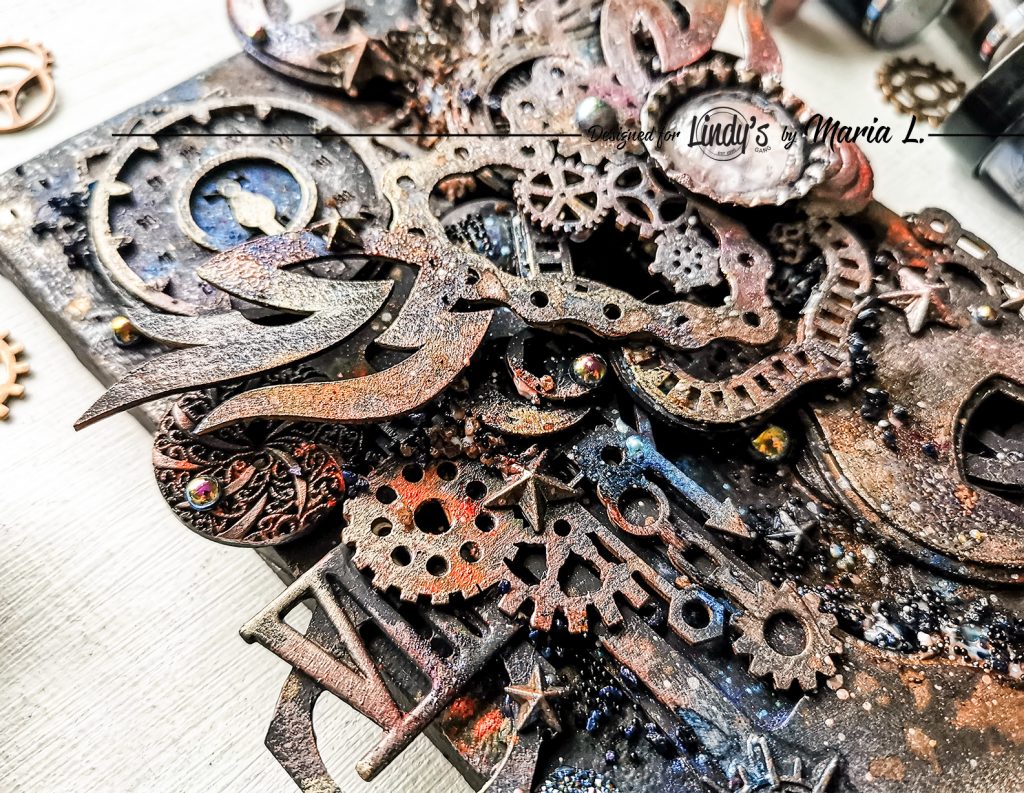
And some close-ups:
The face sticker is from 7 Dots Studio
Lindy’s Products
Starburst Spray: Mission Bells Brown
Magicals: Sweet Violet Purple Teal, Hydrangea Blue, Canna Lily Burnt Orange (Victorian Bouquet Shimmer Set)
Shakers: Bratwurst Brown, Oktoberfest Orange, Bavarian Blue
EPs: Terra Cotta Rust, Twilight Blue Slate
Other Products:
Canvas (unbranded), Heavy Gesso Black, 3D Gloss Gel, metallic wax, metallic embellishments (Prima Marketing Inc), white metallic paint (Maimeri), chipboard (Lavandovyj Komod, Belarus), face sticker (7 Dots Studio), embossing dabber (Ranger), quartz toppings (Fabrika Decoru), rhinestones (unbranded).
Thank you, dear friends!
Hello, dear friends, and welcome back to Scraps N Pieces Blog! A new challenge has just started, and this time it’s all about the magical world of books! Old and new, big or small, novels, fairy tales, historical, romantic, fascinating…just think of how many adjectives you can use to describe them. Well, that alone tells us how glorious books are!
I was totally inspired by this new mood board and decided to create something vintage and mystical, at the same time, using the color scheme and the elements from the board. The notebook is in size A5 and the cover is made from scratch. This time I played it hard and used tons of mixed media materials :) It took me several days to create the notebook because I just couldn't stop until I was completely satisfied with it. But it was a very pleasing creative process.

As a base for the cover, I used pieces of cardstock. First, I applied black gesso, and then a combination of texture paste, sand paste, crackle texture paste. To color it, I used acrylic paints, alcohol inks, and crackle varnish. I also did some stamping. The front cover is decorated with patterned paper, metallic embellishments, chipboard, beads, brads, and textile hydrangea flowers.

The inside covers are decorated with patterned paper by 7 Dots Studio. Their "Garden Party" collection suits our mood board 100 % :) Plus, I did some stamping and used a single 19th Century biology book page that I had kept on my shelf for ages.


